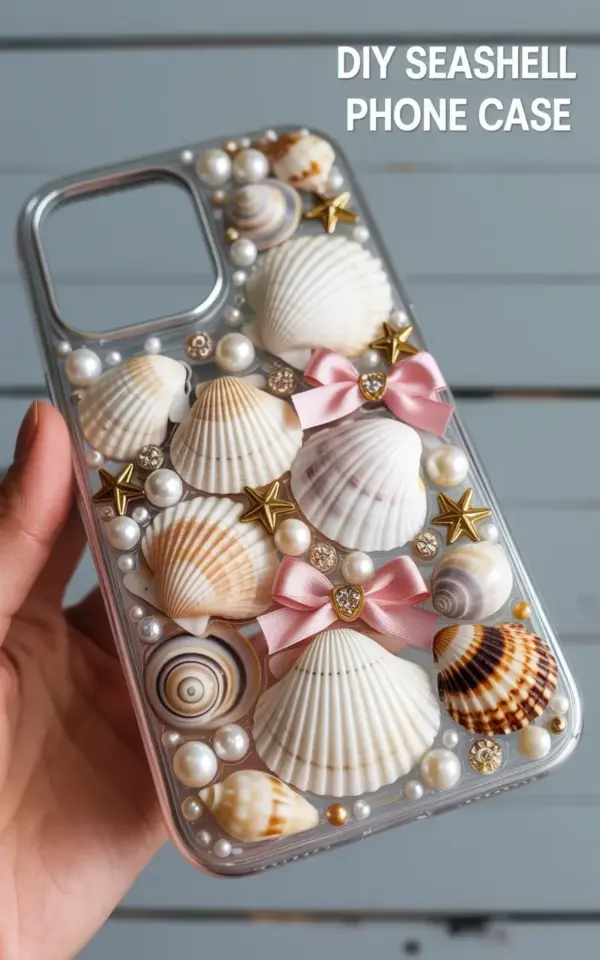
Why This DIY Seashell Phone Case Became My Summer Project
There’s something about summer that makes me want to glue tiny seashells to everything. Honestly, I’ve been on a coastal craft kick since June, and my latest obsession is this DIY seashell phone case. It started when I found half a bag of scallop shells from a beach trip last August. Some of them still smell faintly of salt. Is that weird? Probably. But it adds authenticity. I wanted something that felt beachy but not like a souvenir shop exploded on my phone. The clear resin keeps it clean, and the pink bows and gold stars give it a soft girly touch without going overboard. If you love ocean-inspired accessories or just want something unique for your phone, this is a perfect weekend project.
What You’ll Need for a Beachy Summer Phone Case
Look, the supply list is short. That’s the beauty of this craft. You probably already have some of these things lying around, especially if you’re a shell hoarder like me. Here’s what I used:
- A clear, hard plastic phone case (the kind that snaps on, not the soft gel ones, resin sticks better to hard plastic)
- Real seashells in different sizes and shapes: I used a large scallop shell as the centerpiece, plus a few tiny spiral shells and one delicate shell with a spiral pattern
- Small pearls (the kind you find at craft stores in the jewelry aisle, not expensive real ones)
- Gold star-shaped studs (they come in packs for nail art, super cheap)
- Pink bow decorations, I actually snipped these off a cheap hair clip because I couldn’t find loose bows anywhere. Desperate times.
- Clear UV resin and a UV lamp (or epoxy resin if you have 24 hours to wait)
- Toothpicks, tweezers, and a small paintbrush for positioning
One weird tip: put your shells on a baking sheet and heat them in the oven at 200°F for about 10 minutes. Gets rid of any moisture that could make the resin bubble. I learned that the hard way.
How to Arrange Your Seashell Design on the Phone Case
Don’t just throw everything on there and hope for the best. Trust me, I tried that first. It looked like a pile of beach trash. Before you mix any resin, lay out your shells, pearls, and stars on the phone case and step back. Take a photo. Move things around. My final arrangement had the large scallop shell near the bottom right corner, with spiral shells clustering around it like little satellites. The pink bows went in a diagonal line, one near the top left, one near the middle, one near the bottom right. I scattered the gold stars and pearls randomly, but with a sort of scattered balance. Not too symmetrical, not too chaotic. Does that make sense? It’s a vibe.
(And hey, if you’re using shells you collected yourself, this part feels extra special. I kept thinking about the exact spot on the beach where I picked up each one. Like a tiny memory map on my phone case.)
Mixing and Pouring Resin Without Panicking
Ok, so resin can be intimidating. But for a small project like this, it’s actually pretty chill. I used UV resin because it cures in a few minutes under a lamp, which meant I didn’t have to wait overnight to see if I messed up. Here’s the thing: work in thin layers. Pour a thin coat of resin onto the back of your phone case, then place your shells and decorations into it. Use a toothpick to nudge them exactly where you want. The resin will hold them in place.
Then cure it under the UV lamp for 2 minutes. After that, pour another thin layer over everything to seal the shells in. This second layer is where you want to watch for air bubbles. I popped mine with a pin. Then cured again. My cat decided to walk across the table during the second cure, so I now have a faint paw print in the resin on the right edge. Honestly? It’s kind of cute. It adds character.
Adding the Girly Touch: Pink Bows and Gold Accents
The pink bows are what make this case feel special, not gonna lie. Without them, it’s just a shell case. With them, it’s a piece of coastal jewelry for your phone. I glued the bows on after the main resin layer was fully cured. Why? Because they’re fabric or plastic, and I didn’t want them to get saturated and lose their shape. A tiny dot of super glue works perfectly. Press them down for ten seconds, done.
For the gold star studs, I embedded them in the top resin layer while it was still wet. That way they sit flush with the surface. If you want them to pop out a little more, glue them on top after curing. I did a mix of both. The gold against the white pearls and pink bows and the natural beige of the shells, it’s a color palette that just works. Very summer 2025, very sailor-meets-soft-girl aesthetic.
Curing and Final Touches (Plus a Tip on Bubbles)
Patience is the hard part. If you use UV resin, cure each layer fully before moving on. I did three thin layers total. The final layer has a glossy finish that makes the shells look wet and alive. Exactly what you want for a beachy vibe. One mistake I made: I accidentally cured a layer before I was done arranging, so a pearl ended up half-submerged and tilted. Looks like it’s sinking into the resin. I actually love that now. It feels organic.
If you use epoxy resin instead, you’ll need to let it sit for 24 hours in a dust-free area. Put a box over it. Trust me. Dust is the enemy. And bubbles? The best trick is to gently blow on the resin through a straw right after pouring. The warm breath pop the surface bubbles. Works like magic.
How to Style Your New Coastal Phone Accessory
So you made the case. Now what? It’s a conversation starter, for sure. I’ve had people stop me at coffee shops to ask where I bought it. They can’t believe it’s DIY. Pair it with a white sundress or a denim jacket for that summer coastal craft feel. The light gray wooden background in my photos (my kitchen table, honestly) really makes the shells pop, so if you’re planning to share your project on Pinterest, think about your backdrop. A piece of driftwood, a linen napkin, even a sandy towel works.
And yes, you could totally make these as gifts. Imagine a little set: a phone case and a matching keychain made from leftover shells. I’m already planning one for my sister’s birthday. She’s not a crafty person, but she loves unique accessories. This fits the bill without being too fussy.
Go Ahead and Try It With Shells You’ve Collected
That’s the part I love most about this project. You don’t have to buy a kit. You can use shells from a recent beach trip, or even ones you found years ago stuffed in a drawer. Each one has a little story. And now that story is on your phone. The resin preserves them perfectly, keeps them from cracking, and makes them look like they’re floating in ocean water. It’s not complicated. It’s not expensive. It’s just you, some resin, and a handful of memories.
Give it a shot this weekend. And if your cat walks through it? Just call it an artistic decision. I did.
Leave a Comment