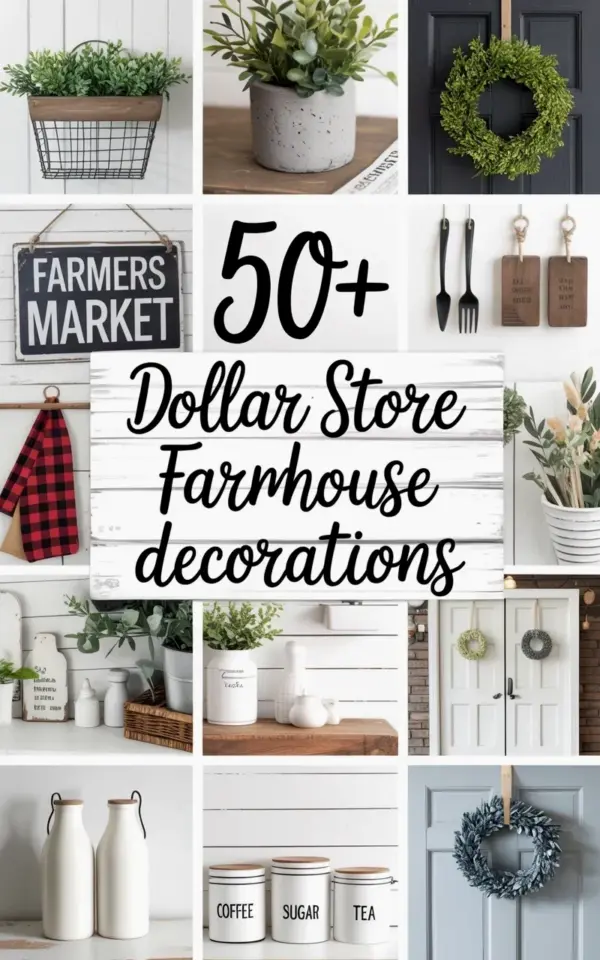
I pulled up that Pinterest collage the other day and honestly, I couldn’t stop staring at it. The wire basket with greenery, the concrete planter, the little wooden blocks with twine. All from a dollar store? That dollar store farmhouse decorations grid is basically a treasure map for anyone who loves the farmhouse look but refuses to spend boutique prices. The before and after potential in those 50+ ideas is ridiculous. I mean, that Farmers Market sign alone looks like something you would grab at a high end decor shop, but it came from the same aisle as plastic spatulas and party napkins.
So here is the thing. You do not need a big budget to make your home feel cozy and curated. You need a little creativity, a lot of twine, and a willingness to walk past the candy aisle without getting sidetracked. Let me walk you through some of my favorite themes from that collage. Grab a coffee (or iced tea, I am not picky) and let us talk about how to make dollar store finds look like million dollar upgrades.
Wire Basket and Greenery Combos That Look Expensive
The top left image in that collage is a wire basket stuffed with artificial green foliage. And I know what you are thinking. Wire baskets from the dollar store usually look flimsy and sad. But here is the trick: spray paint them. Not gonna lie, a coat of matte black or antique bronze changes everything. That basket in the photo probably cost a buck and a half. With a can of spray paint you already own (or a $4 can from the hardware store), it becomes a high end display piece.
Pair it with faux greenery that you fluff aggressively. Dollar store greenery can look flat and plasticky. So you have to bend the leaves, pinch the stems, and separate the branches. Make it look alive. I once spent twenty minutes just teasing apart a $1.25 fern. My husband walked in and asked if I was performing surgery on a plant. Yes. Yes, I was. The result was totally worth it.
Here is a quick list of things you can do with a wire basket and greenery:
- Fill with eucalyptus stems and set on a kitchen counter as a centerpiece.
- Hang it on the wall with a ribbon and tuck in a few dried flowers.
- Use it as a napkin holder on a farmhouse dining table (just roll cloth napkins and stuff them in).
- Add a string of battery operated fairy lights inside for a warm glow at night.
The before is a sad, empty wire bin. The after is a rustic decor piece that looks like it came from a pricey home goods store. That transformation is free. Well, almost free.
Concrete Planters on a Dime
Ok so the gray concrete planter in the collage? That thing has a clean, modern farmhouse vibe that I absolutely love. Real concrete planters are heavy and expensive. But dollar store concrete look planters (often made of lightweight resin or plaster) cost pocket change. The trick is to distress them a little. Sand the edges gently with fine grit sandpaper to reveal a lighter shade underneath. It gives them that weathered, aged look.
Or you can make your own concrete planters using dollar store supplies. Yes, really. Grab a small plastic container, mix some concrete patch from the hardware store (less than $5), and pour it in. Insert a smaller cup as a mold. Wait a day. Pop it out. You get a custom planter that costs pennies. I did this last summer and ended up making six of them. My cats immediately knocked one off the shelf and it cracked. That is fine. Imperfect is farmhouse.
The before is either a boring plastic pot or an empty space on your shelf. The after is a weighty, textured planter that holds a succulent or a little faux fern. It grounds your decor and adds that industrial touch farmhouse fans love.
Green Wreaths That Do Not Scream Faux
In the top right of the collage there is a green wreath hanging on a dark wall. That wreath is likely a dollar store find, but the key is how you style it. Do not just hang it bare. Add a burlap bow, a few small wooden letters, or a sprig of lavender. My personal trick: buy two cheap wreaths and wire them together. Double the fullness, double the luxury look. Then fluff every single leaf. I cannot stress this enough. Fluff until your fingers hurt.
Another idea for a before and after: take a plain grapevine wreath from the dollar store and hot glue clusters of artificial boxwood stems onto it. The base wreath costs a dollar. The stems cost a dollar each. You might spend $5 total. The result is a lush, full wreath that would sell for $40 at a pumpkin patch boutique. I made one for my front door last fall and it stayed beautiful for months. Until a bird tried to nest in it. That was a fun discovery.
Farmers Market Sign Wall Art
That black and white Farmers Market sign in the middle row of the collage steals the show. It looks like a vintage market sign from a French flea market. But it is probably a piece of dollar store chipboard or a canvas board with a printed design. Sometimes you can find these in the seasonal section for $1.25. My advice: frame it. Dollar store frames are cheap and often ugly. But if you paint the frame matte black or white, it instantly elevates the sign into real wall art.
Or take it a step further. Make your own sign using a dollar store wooden plaque, some black craft paint, and a paint pen. Write “Farmers Market” in a slightly uneven font. That handmade imperfection is what makes farmhouse decor feel authentic. I once tried to make a sign that said “Coffee” for my kitchen. The lettering was so crooked that my neighbor asked if it said “Coffe” instead. I left it. It became a conversation starter.
Hang it over a window or on a gallery wall with other thrifted finds. The before is a blank wall. The after is a bright, charming focal point that reminds you of weekend farmers markets and fresh produce. Even if the only produce in your kitchen is a bag of frozen peas.
Wooden Blocks and Twine Projects
Ah, the two brown wooden blocks with hanging twine. That is the kind of project that screams “I made this in ten minutes and it looks like I paid $30.” Wooden blocks from the dollar store are often in the craft aisle. They might be plain, unpainted wood. Sand them lightly (because sometimes they have splinters that will ruin your whole afternoon). Then stain them with a cheap vinegar and steel wool solution, or just rub on a little dark wax.
Drill two small holes in each block, thread some twine through, and knot the ends. You can hang them as a set of two or three. Or use them as table signs for a party. Write “Gather” on one and “Grace” on the other. Or just leave them blank for a minimalist look. Honestly, the raw wood texture is enough.
I made a set of these for my porch and tied them to a rusty old metal hook. The before was an empty hook that looked sad. The after is a rustic hanging decoration that catches the wind and gently sways. I call it my lazy man’s wind chime. No sound, just good vibes.
Budget Before and After Transformations
The whole idea of a “before and after” is what makes this collage so satisfying. You can scroll through and imagine the cheap plastic vase before, and the updated farmhouse version after. The transformation does not require skill. It requires a bit of patience and a willingness to paint things.
One of my favorite before and after tricks from that collage involves dollar store glass jars. You know the ones. They are awkwardly shaped and come with ugly black lids. Take the lid off. Spray paint it with chalk paint. Then wrap twine around the neck of the jar. Fill with baby’s breath or dried lavender. Bam. Farmhouse candle holder or vase. The before is a jar you were going to recycle. The after is a $12 decor piece.
Another one: dollar store wooden trays. They are usually raw and rough. Paint them a creamy white, sand the edges to distress, and add a thin coat of polyurethane. Use it to corral remotes on your coffee table or to hold hand soap in the bathroom. Before and after, done.
Look, I have a whole shelf in my living room that is 90% dollar store finds and 10% good lighting. Nobody has ever asked if it is cheap. They just say “I love your style.” And that is the goal. You want the look, not the price tag.
Where to Start Your Dollar Store Run
So you are ready to grab that collage as your mission plan. Print it out. Take it with you. Or just save it to your phone like I do. Start with the items you see in the photo: wire basket, concrete planter, green wreath, Farmers Market sign, wooden blocks, twine. Those are your anchor pieces. Then branch out into related items like wooden letters, galvanized buckets, and burlap ribbon.
One thing I always do: bring a small bag of basic supplies with me. A tiny bottle of hot glue, a pair of scissors, and a Sharpie. Yes, that sounds crazy. But I cannot tell you how many times I have used a sharpie to darken a plastic rim or fix a discolored spot. It is a cheap cheat code.
And do not forget to look in the seasonal aisle. The dollar store rotates inventory quickly. In spring you find pastel farmhouse stuff. In fall, pumpkins and wood slices. In winter, pinecones and white berries. If you miss a season, the items get deeply discounted. I once scored a stack of farmhouse-style wooden signs for twenty-five cents each after Valentine’s Day. My heart still races thinking about it.
Anyway, the point is: you can absolutely get that high end farmhouse look without spending high end money. The collage proves it. Your home can be the before and the after, all in the same budget.
I hope this gives you some ideas for your next dollar store run. Grab a friend, make it a little adventure. And when you bring home that wire basket and twine, text me a picture. I want to see what you create.
#dollartree #farmhousedecor #diyfarmhouse #budgetfriendlydecor #homebeforeandafter
Leave a Comment