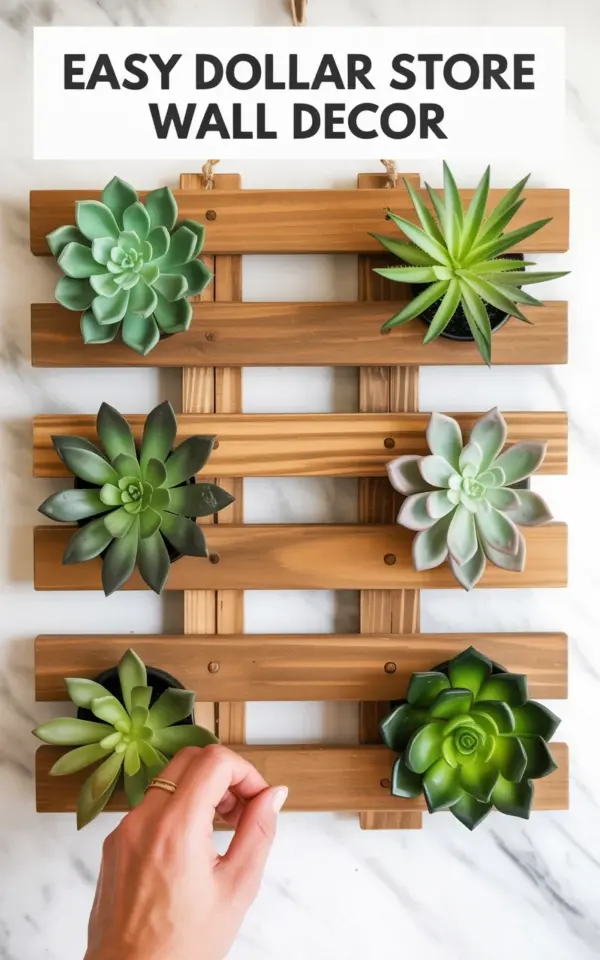
Last weekend I turned a ten dollar trip to the dollar store into this wooden slat succulent art, and I honestly can’t believe how good it looks for the price. I had been scrolling for budget home decor ideas and kept seeing those expensive wooden plank wall hangings at big box stores. So I grabbed some wooden slat tiles, a handful of faux succulents, and a hot glue gun to see if I could make my own version. This dollar store wall decor project took me about an hour and cost less than fifteen bucks, but it looks like something from a boutique shop. The geometric pattern, the muted greens, and that simple banner across the top make it feel intentional and modern.
Why wooden slat tiles work so well for budget DIY wall art
I’ve tried a lot of dollar store craft supplies over the years, but those pre made wooden slat tiles are a hidden gem. They come in packs of four or six, already glued together in a grid of horizontal slats. Each tile feels sturdy but lightweight, which means you can hang it with a single nail or a strip of command tape. For this project I used two tiles arranged side by side, but I also experimented with stacking them in a staggered pattern. The slatted texture adds depth without needing any extra painting or staining. If you want a warmer tone, you can wipe them with a little mineral oil or a light stain, but I left mine raw for a cleaner, more modern look.
My shopping list for this under 15 dollar project
- Wooden slat tiles – two packs from the dollar store, about 4 dollars total.
- Artificial succulents – six stems in varying shades of green and pale mint, around 5 dollars for the bunch.
- White rectangular banner – a blank craft tag or piece of cardstock, plus a black marker, about 1 dollar.
- Hot glue gun and glue sticks – already had these, but glue sticks are cheap if you need them.
- Picture hanger or adhesive strips – for hanging, under 2 dollars.
The total came to roughly 12 dollars. I already had the marker and glue gun, but even buying everything new you should stay under 15. I like that this list is short and you can find all of it in the craft aisle or the home section of any dollar store.
Step by step: arranging the geometric pattern
I started by laying the two wooden slat tiles on my floor side by side. At first I had them perfectly aligned, but it looked a little flat. Then I shifted one tile up by about two inches so the slats staggered. That small change made the whole thing feel more dynamic and less like a simple grid. I played around with the succulent stems, placing them in clusters near the center and letting one or two trail off toward the edge. The stems have a soft wire inside, so you can bend the leaves slightly to give them different angles. Once I had the arrangement right, I glued each succulent base to the wooden slats. I worked in small sections so the glue wouldn’t dry before I placed the plant. A few of the smaller leaves popped off during gluing, but I just stuck them back on with a tiny dot of glue. Nobody notices.
Choosing the right artificial succulents for a natural look
Not all fake plants are created equal. I picked succulents that had a matte finish instead of a glossy one, because glossy looks cheap to me. The ones I found came in a bundle with three different shades: a deep olive green, a dusty sage, and a pale mint. Those mint ones matched the banner perfectly, which was a nice coincidence. I also made sure the stems had multiple small rosettes so I could cut them apart and place each rosette separately. That gave me more control over the spacing. If you can only find large single succulents, try trimming them with scissors or using individual leaves glued close together to create a fuller look. Avoid anything with glitter or shiny plastic stems. Realistic texture makes all the difference when you’re trying to pass off dollar store decor as expensive art.
Adding a simple banner for a custom touch
In the photo you can see a white rectangular banner at the top of the wooden slat art with the words “Easy dollar store wall decor” written in black. I made mine by cutting a 2 by 6 inch rectangle from a blank white notecard. I freehanded the lettering with a fine tip black marker, but you could use a stencil or print the text on cardstock and tape it in place. I glued the banner directly onto the top slats, letting it hang slightly over the edge of the tile. It gives the piece a kind of craft fair feel, like a little label that says, “Yes, I made this and I’m proud of it.” If you prefer a cleaner look, you can skip the banner or swap it for a small piece of wood burned text. But I like the contrast of the white against
#dollarstorediy #diydecor #walldecor #dollaramahacks #budgethomedecor
Leave a Comment